My take on a custom laptop
Inspired by bunnie's Novena, I decided to build my own customized laptop with focus on experimentation with hardware.
My main motivation for this project was that I got tired of lugging around devboards, USB UART bridges half-assembled projects. Also, I'm usually a bit concerned about my soldering skills and EE knowledge when connecting something to my daily laptop.
So, I wanted a laptop-like container for ARM-based SBC, logic analyzer, one or more microcontroller devboards and at least a few UART interfaces.
I also had an old, barely working laptop (who hasn't?) so I reused it for this project. Thus, a project dubbed hydra was born.
Screen
Initially I thought connecting the existing LCD screen will be the hardest part of this project. It actually turned out to be quite easy- I found the datasheet for the LCD controller and confirmed that it indeed uses LVDS (which LIME has broken out). Connecting it to LIME was just a matter of soldering a few tiny wires and configuring the LIME with parameters of particular display controller.
There was no datasheet for the backlight driver but it was easy to figure out it's pinout by probing the pins while the backlight was still connected to working laptop.
Case & keyboard
I knew that I wanted an easy access to the business end of this laptop, so I thought I will have a removable keyboard.
The original keyboard for this laptop was a piece of garbage though. Luckily I had a keyboard from ThinkPad T400. To connect it to the laptop, I either had to figure out it's pinout, connect it to microcontroller or LIME, and write some code for it, or buy a USB adapter for it. I chose the latter.
The trackpoint on the keyboard nicely solved the need for mouse and the keyboard was small enough. Or so I thought.
Eventually I realized that the keyboard won't quite fit because of the height of Ethernet and USB connectors on the LIME. I am not yet sure if I will try to make it fit or settle on wireless keyboard with touchpad (because I don't see a point in lugging around a wired keyboard if it's not integrated within the laptop itself.
As for the case- after going through a few Dremel's cutting discs and two sticks of hot glue, I fit everything I wanted :)
Power supply
Running this laptop requires a few different voltage rails:
- 11-20V for the backlight of display. Straight from the power adapter or battery
- 5V @ 2-3A for the LIME and SATA disk.
- 3.3V @ 2A for the LCD controller.
Looking around for battery-charging solutions I didn't find really simple charging/balancing systems for 3-4 cell lithium battery packs, so I decided to charge the battery externally, and just have low-voltage cutoff for RC battery packs without protection.
So, for the power supply I had to build a simple PCB with two switching mode DC-DC converters on board, two Schottky diodes as a simple OR-ing of the power source (battery or wall-wart), and a low-voltage cutoff for the battery.
I used LM2576 ICs because of their simplicity and EN input. As for the low-voltage cutoff- instead of going a simple comparator route, I have an ATTiny13 there, for the simple reason that I didn't want to order really low power voltage references.
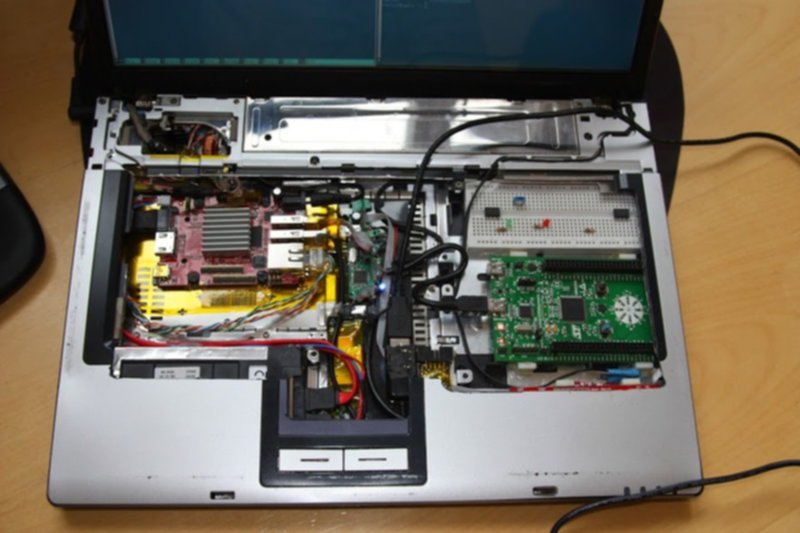
BOM, or what do you have there?
- Olimex A10 LIME
- SATA hard disk
- Two 4-port USB hubs
- OpenWorkbench logic analyzer
- USB UART bridge
- STM32F3-DISCOVERY board
- USB WiFi adapter
- usbasp programmer for AVRs
- Small piece of breadboard
- Two general-purpose USB sockets
I still have a spare USB port, and a little bit of free space for the BusPirate.
Conclusion
I actually had to accelerate this project, as my daily laptop died on me, and I quickly needed a replacement while it's being repaired.. I have been using it for about a week, and it's quite usable even for tasks I didn't plan on using it, although it is underpowered compared to proper laptops.
I really do hope Olimex will break out LVDS on their upcoming octa-core Allwinner A80 based board, as that seems like an ideal base for a laptop like this.
Comments